Content
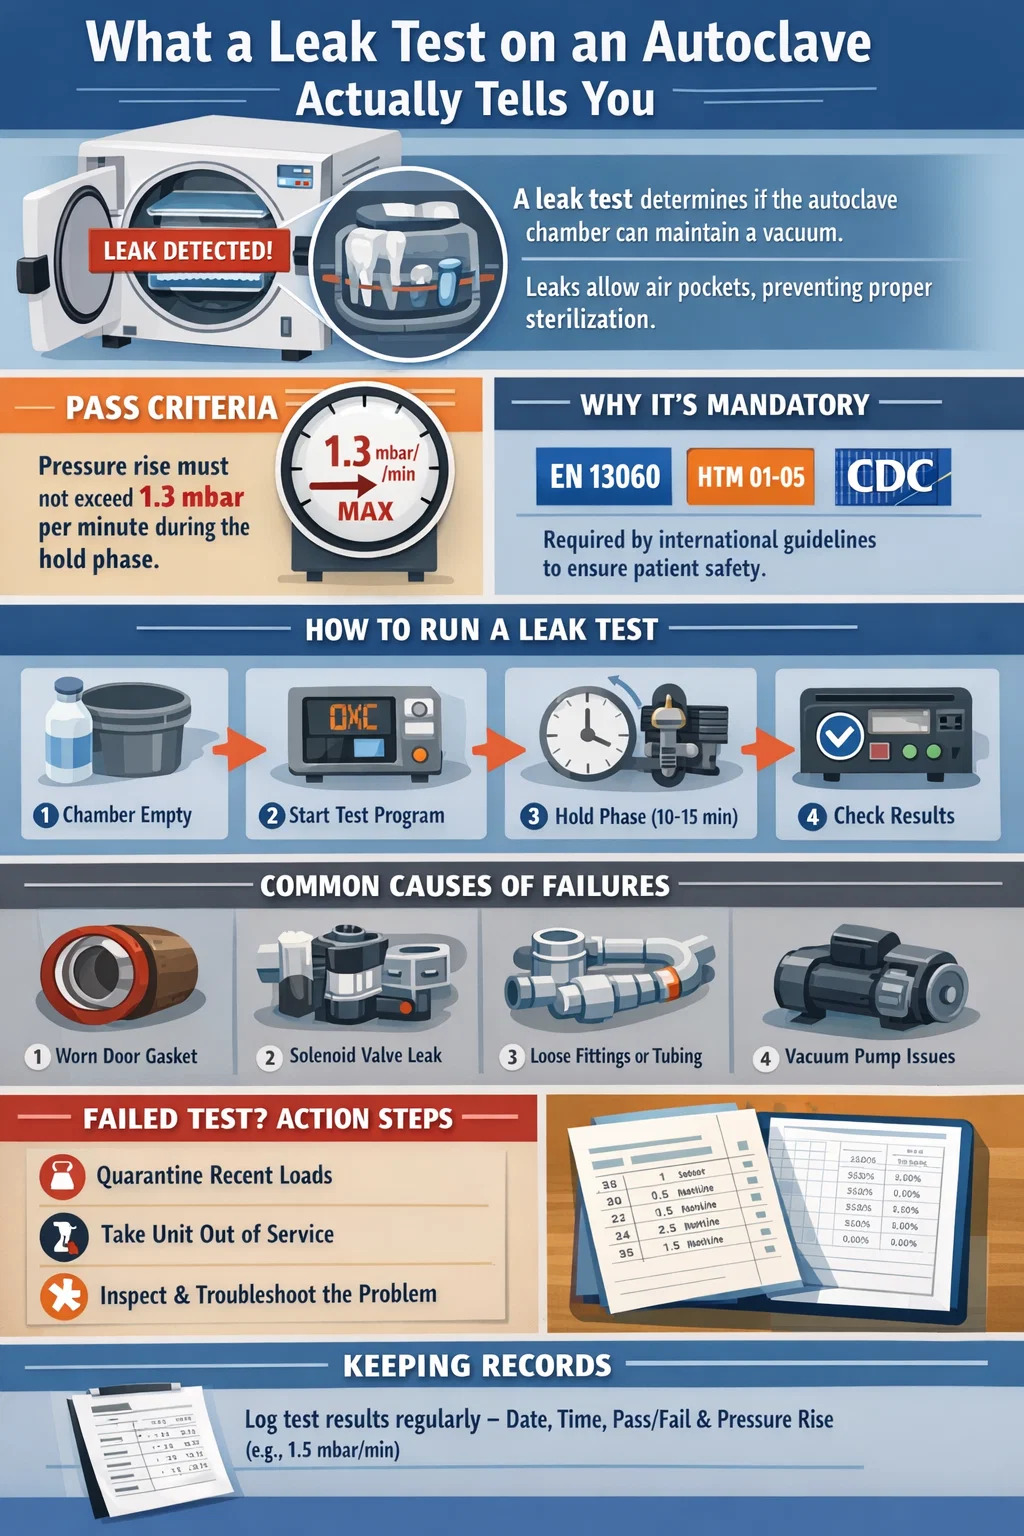
A leak test on an autoclave — also called a vacuum leak test or air leak test — measures how well the chamber holds a vacuum before the sterilization cycle begins. If the chamber cannot maintain negative pressure within an accepted threshold, air is entering the system. Air pockets prevent steam from reaching instrument surfaces uniformly, which directly compromises sterilization efficacy. In a dental autoclave, this is not a minor calibration issue; it is a patient safety concern.
The pass/fail benchmark for most dental autoclave models is a pressure rise of no more than 1.3 mbar (0.13 kPa) per minute during the hold phase of the leak test. Some manufacturers set a tighter limit of 1.0 mbar per minute. Any reading above the manufacturer's stated threshold means the cycle should not proceed until the source of the leak is identified and corrected.
Understanding this test — how to run it correctly, how to read the results, and what to do when it fails — is one of the most practical skills for anyone responsible for instrument reprocessing in a dental practice.
Regulatory bodies and professional standards organizations across multiple countries require periodic leak testing as part of routine autoclave validation. The European standard EN 13060, which governs small steam sterilizers including those used in dental settings, specifically requires a vacuum leak test as part of the qualification and routine testing protocol. The HTM 01-05 guidance in the UK similarly mandates it. In the United States, the CDC guidelines for infection control in dental health care settings emphasize following the manufacturer's instructions for sterilizer testing, which universally include leak tests.
Beyond compliance, there is a direct mechanical reason. Pre-vacuum dental autoclave cycles work by pulling a series of vacuum pulses to remove air before steam is injected. If the chamber leaks, residual air forms insulating pockets around instruments. Steam temperature at the surface of the instrument may read correctly on the sensor, but the actual contact temperature in those air pockets can be 5°C to 15°C lower than the chamber sensor reading, which is enough to leave biological indicators unchallenged and pathogens viable.
Gravity displacement autoclaves are less sensitive to air leaks during the sterilization phase itself, but leaks still affect drying performance and can contaminate the load during the cooling phase by drawing in unfiltered air.
The procedure below applies to the majority of Class B and Class S dental autoclaves that include an automated leak test program. Always cross-reference with the specific manual for your unit, as timing and pressure values differ by manufacturer.
Log the date, time, result (pass/fail), and the actual pressure rise value if your unit displays it. Many dental practices use a paper log or a digital spreadsheet. Some autoclaves print a cycle record automatically. Keep records for a minimum of two years, or longer if your local regulatory body requires it. This documentation is reviewed during practice inspections and is necessary evidence if a sterilization failure is ever investigated.
Frequency requirements vary by standard and by how heavily the autoclave is used, but the following table summarizes common recommendations across major guidelines:
| Guideline / Standard | Minimum Frequency | Notes |
|---|---|---|
| EN 13060 (Europe) | Daily (each day of use) | First test of the working day, before patient cycles |
| HTM 01-05 (UK) | Daily | Required as part of daily user checks |
| CDC (United States) | Per manufacturer instructions | Most US dental autoclave manufacturers specify daily or weekly |
| After servicing or repair | Immediately after any maintenance | Applies universally regardless of country |
| After moving the unit | Before resuming clinical use | Physical relocation can dislodge gaskets or fittings |
For high-volume dental practices processing more than 15 to 20 loads per day, running the leak test at the start of each shift — rather than just once daily — is a sensible precaution. The test itself takes under 20 minutes on most units and does not consume sterilizable load capacity.
When a dental autoclave fails its leak test, the cause is almost always one of a predictable set of components. Knowing where to look first saves significant diagnostic time.
The door gasket is the single most common cause of leak test failures in dental autoclaves. It is a silicone or EPDM rubber seal that compresses when the door closes, creating an airtight boundary between the chamber and the external environment. With repeated thermal cycling — expanding under heat, contracting during cooling — the gasket eventually loses its ability to maintain an adequate seal.
Most manufacturers recommend replacing the door gasket every 12 months or after approximately 500 to 1000 cycles, whichever comes first. In busy practices running 20 cycles per day, that 1000-cycle mark can be reached in under 2 months. Visual inspection alone is insufficient — a gasket that looks intact can still fail to seal under vacuum conditions. Signs that a door gasket needs replacement include:
Dental autoclaves use solenoid valves to control the flow of steam, water, and air through internal circuits. A solenoid valve that does not fully close — due to a worn seat, debris lodged in the seat, or a failed coil — will allow a slow but measurable pressure increase during the vacuum hold phase. This can mimic the appearance of a door leak but will not resolve after gasket replacement.
Identifying which solenoid is the culprit usually requires a service technician with access to pressure testing equipment and wiring diagrams. However, if your autoclave has recently undergone a water quality change — for example, if the practice switched water sources or the filter was not changed on schedule — mineral scale inside solenoid valves is a highly likely cause.
Connections between the steam generator, the chamber, and the vacuum pump involve compression fittings, O-rings, and tubing. Any of these can develop a slow leak after vibration from regular use, improper reassembly after maintenance, or thermal stress over time. These leaks are often intermittent, meaning the autoclave may pass the leak test on some days and fail on others. Intermittent failures should be treated with the same urgency as consistent failures and should not be attributed to test error.
While the vacuum pump itself is not typically a source of leakage into the chamber, a worn pump that cannot pull down to the target vacuum depth will cause the test to fail before the hold phase even begins. If your autoclave consistently reaches only -0.70 bar instead of the target -0.90 bar, the pump output is degraded. This can result from worn vanes (in rotary vane pumps), emulsified oil, or a partially blocked exhaust. Pump performance should be checked annually as part of preventive maintenance.
In rare cases, a leak test failure is a false positive caused by a miscalibrated or drifting pressure transducer. If the autoclave fails the leak test but no physical leak can be found after thorough inspection, and the unit has not been calibrated in the past 12 months, sensor drift is worth investigating. This diagnosis requires comparison against a calibrated reference gauge and should be performed by a qualified service engineer.
Because door gasket replacement is the most frequent corrective action following a failed leak test, the process deserves detailed treatment. The steps below apply broadly to most tabletop dental autoclaves, though the exact gasket profile and fitting method vary by manufacturer.
If the unit still fails the leak test after a correctly installed new gasket, the problem lies elsewhere in the system and requires professional diagnosis.
A failed leak test is not simply a note for the maintenance log. It has immediate operational consequences that must be managed before patient care continues.
Any instruments sterilized in a dental autoclave after the last confirmed passing leak test must be considered potentially non-sterile and must not be used clinically until re-sterilized in a validated unit. This is not a conservative interpretation — it is the standard response required under EN 13060 and HTM 01-05, and is consistent with CDC guidance. The number of loads involved depends on when the last passing test was recorded, which is why daily testing and accurate recordkeeping are operationally essential. A practice that tests weekly and discovers a failure may need to quarantine up to a week's worth of instrument loads.
The autoclave should not be used for patient instrument sterilization until the fault is corrected and a passing leak test is achieved. If the practice has a second autoclave, switch to it. If not, implement your contingency plan for instrument reprocessing — this may involve using single-use instruments, postponing non-urgent procedures, or sending instruments to an external reprocessing facility.
Before scheduling a service call, a trained staff member can rule out the simplest causes:
If the unit fails again after these checks, escalate to a service engineer. Attempting to investigate solenoid valves, steam traps, or internal tubing without proper training and tools risks causing additional damage and voiding any remaining warranty.
Not all passing results are equally reassuring. A dental autoclave that consistently passes at 1.2 mbar/min — just under the typical 1.3 mbar/min limit — is not in the same condition as one that passes at 0.3 mbar/min. Tracking the actual pressure rise rate over time, not just the pass/fail outcome, gives early warning of a deteriorating seal before it causes an outright failure.
| Pressure Rise Rate | Interpretation | Recommended Action |
|---|---|---|
| Below 0.5 mbar/min | Excellent — unit in good condition | Continue routine testing; no action required |
| 0.5 – 0.9 mbar/min | Good — normal aging | Monitor trend; inspect gasket at next service |
| 1.0 – 1.2 mbar/min | Warning zone — approaching limit | Inspect and likely replace door gasket proactively |
| Above 1.3 mbar/min | Fail — unit must not be used | Remove from service; investigate and repair |
Some dental autoclave management software and service platforms now allow automatic trending of leak test data. For practices without such software, maintaining a simple spreadsheet with the date and the measured rate is sufficient to spot a worsening trend over weeks or months.
The leak test is one component of a validation program, not the whole of it. A dental autoclave that passes the leak test can still fail to sterilize if other parameters are out of range. A complete routine testing program for a dental autoclave includes:
The leak test is the fastest, most frequent check in this program, which is precisely why it has such operational value. It takes under 20 minutes and provides immediate feedback on chamber integrity before any instrument loads are committed to the cycle.
For dental practices purchasing a new autoclave or replacing an existing unit, note that the initial qualification of a dental autoclave involves three consecutive passing leak tests as part of the installation qualification (IQ) process under EN 13060. This establishes the baseline performance of the unit before clinical use begins.
Not all dental autoclaves handle leak testing with the same level of automation, reporting, and consistency. When evaluating models, the following features directly affect the reliability and usability of the leak test function:
Leak testing is only as reliable as the person performing it. A test run incorrectly — for example, on a cold autoclave, with the door not fully latched, or with debris on the gasket seating surface — will produce an unreliable result. Both a false pass and a false fail have consequences: a false pass places patients at risk, while a false fail removes a functioning autoclave from service unnecessarily.
Staff responsible for autoclave operation should receive documented training that covers:
Training should be repeated whenever a new autoclave model is introduced to the practice, whenever a new staff member takes on decontamination responsibilities, and at least annually as a refresher. Competency should be assessed practically, not just through written tests — watching a staff member actually perform the procedure is the only reliable way to confirm they can do it correctly under real conditions.
Documentation of training is as important as the training itself. In the event of a regulatory inspection or a patient safety incident, training records form a critical part of the evidence that the practice operates a controlled, managed decontamination process.
If you have any question for the installation
or need support, please feel free to contact us.
86-15728040705
86-18957491906
 English
 عربى
عربى